Back to School Pencil Soaps – Recipe & Tutorial
Last updated October 14, 2024
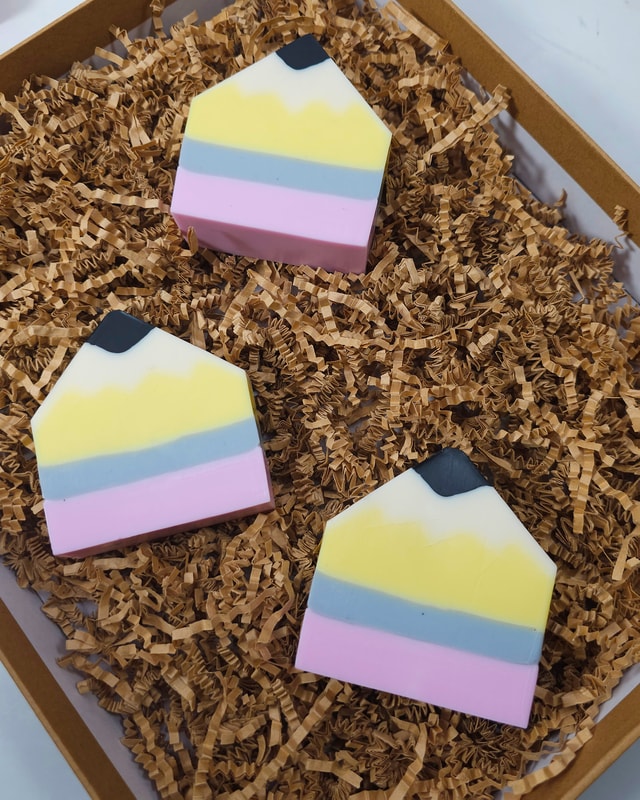
With the back-to-school season just around the corner, we’ve got something special to add a touch of magic to your daily routine: DIY pencil soap! Whether you’re a student gearing up for the school adventures or a parent searching for a creative activity, we’ve got just the thing for you. These pencil soaps can act as unique gifts for teachers or classmates, or make a creative addition to your seasonal product line! Adding a unique shape and a burst of crisp apple aroma to your hand-washing routine, these pencil soaps bring a delightful twist. Get ready to craft, learn, and share the joy with these adorable pencil soaps that are simply perfect for this back to school season!
Materials:
- Soap Loaf Mold
- Heat safe bowls/containers
- Mixing tools/Kitchen spoon
- Knife and/or small pallet knife
- Packaging to store/gift your soaps
Instructions:
- Cut all of the Melt & Pour Soap into 1 inch cubes for easier measuring and melting
- Measure out 8 oz of Shea Butter M&P Soap Base and melt in 30 second increments in the microwave until completely melted
- Add a few drops of the liquid pink colorant to the soap base and mix thoroughly, add 1 drop at a time until your desired hue is reached. Also mix in 3/4 tsp of Country Apple Fragrance Oil
- Pour the melted, pink soap into the soap loaf mold and let cool until hardened, but still warm
- Measure out 8 oz of Shea Butter M&P Soap Base and 0.2oz of Charcoal Soap Base (about 2 cubes)
- Melt in 30 second increments in the microwave until fully melted
- Thoroughly mix in 3/4 tsp of Country Apple Fragrance Oil
- Gently pour the melted, grey soap into the soap loaf mold on top of the pink layer. Let cool until hardened, but still warm
- Measure out 16 oz of Shea Butter M&P Soap Base and melt in 30 second increments in the microwave until completely melted
- Mix in 1.5 tsp of Country Apple Fragrance Oil. Then, mix in yellow liquid colorant, a few drops at a time until your desired hue is reached
- Gently pour the melted, yellow soap into the soap loaf mold on top of the grey layer. Let cool until hardened, but still warm
- With a pallet knife (or small knife), evenly mark 4 shallow lines lengthwise down the top of the yellow soap. These will be used as guides for the next step
- Using the lines on the top of the soap as your guide, carve a chevron pattern in the top of the soap. To do this, place your knife into the first line on the soap top at a 45° angle and cut all the way down lengthwise. Then, place your knife into the next line on the soap top and cut at a 45° angle towards the last cut you made. The two cuts should meet in the middle slightly below the surface of the soap. You should then be able to pull the excess soap off the top. Repeat this step for all the guidelines you made.
- Measure out 12 oz of Shea Butter Melt & Pour Soap Base and melt in 30 second increments in the microwave until fully melted
- Mix in 1 1/4 tsp of Country Apple Fragrance Oil. Then mix in the liquid caramel colorant a few drops at a time until your desired hue is reached
- Gently pour the light brown soap onto the top of the yellow soap layer and allow to cool until hardened, but still warm
- With your kitchen spoon, carve a shallow trench into the middle of the soap
- Measure 6 oz of Charcoal Melt & Pour Soap and melt in 30 second increments in the microwave until fully melted
- Mix in 1/2 tsp of Country Apple Fragrance Oil thoroughly. Then gently pour the mixture on top of the light brown layer. Allow to cool completely
- Unmold your soap and cut into normal soap bars. Then cut each soap bar to make a point like the top of a sharpened pencil
- Your soap bars are now complete and ready for gifting or packaging
Tags: